How To Block An Application From Accessing The Internet With Windows Firewall

If you are looking for a way to block an application from accessing the internet with windows firewall, take a look at how you can achieve that.

What Is Windows Firewall?

It is an application that scans all the information entering your system via internet, preventing harmful programs.

It blocks anything and everything that tries to communicate through the firewall. You can always add a list of programs that is allowed to communicate through the firewall.

When you make use of the public network, it is capable of blocking any uninvited request to connect with your computer.

Sis Loves Me – No Firewall Needed

Sis Loves Me - Step Siblings

Sis Loves Me – Step Siblings

Contrary to popular belief you don’t need to block all the XXX website in order to browse Web safely. Series like Sis Loves Me are around for years and they mean no harm. Over 200 episodes must mean something – these guys are in for a long run. Updated every week with step siblings having little affairs it is the golden standard in the genre on the Web. So next time you see Sis Loves Me – take a look, your firewall won’t be needed with this one!

How Can You Turn On Or Turn Off The Firewall?

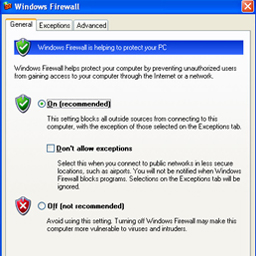
The Windows Firewall has a provision where you can manually choose the settings for both public and private networks. You can also turn it off and on very easily. For Windows 10;

  • Go to your search box and type firewall, then enter
  • Make sure you select the option ‘windows firewall’
  • Now, you can turn it off or on according to your choice

How To Block An Application From Accessing The Internet Even When Your Windows Firewall Is Active?

By now, you have realised that Firewalls prevents any computer security risks or fails, which generally comes from using the internet. And, this means, it also prevents any sensitive information away from the internet, keeping your data safe.

In order to prevent any program from accessing the web, you can customize your Firewall accordingly at that very moment.

  • Go to start and type firewall in your search bar.
  • Once you see ‘windows firewall’ click on that and make sure you don’t go to the ‘windows firewall with advanced security’ option.
  • You will see a link ‘allow a program or feature through windows firewall’, select it.
  • Then click on ‘change settings. At this point, your computer may ask you for the administrator password, which you must type in. If you aren’t the administrator or aren’t familiar with the password, ask someone who knows and type in the correct password.
  • Once the password has been entered, you will go to the next step. And, if there was no prompt asking for your administrator password, that means you are already there.
  • Now you will see a list of programs, with a check box next to them. It is there on the left side of the program.
  • You may have a long-long list. So, be patient and scroll down till you find the exact program.
  • If the program is nowhere present on the list, you can also add it manually. But, when you add it manually, make sure the box is not checked, the one beside it.
  • Once you click ‘allow another program’, to add it manually, typically the file is present on the C drive in either ‘program files’ or ‘program files (x86)’. You must be able to find the file you are looking for here. The program will have .exe extension.
  • Then click on ‘ok’.

How Your Firewall Settings Can Interfere With Your DNS Server

Most DNS server connectivity issues that are experienced are as a result of firewall settings. DNS servers work through queries (See different server software here).

This means that if you block your machine from being queried by means of a firewall, then you’ll definitely not experience any networking. However, many people never realize that they have a firewall problem at first. Here are some of the symptoms to check if you want to know whether your DNS server is being disrupted by your firewall;

  • Your machine taking long to establish a connection
  • Prevention of establishing connections by using DNS names instead of IP addresses

When you encounter these, always know that your firewall settings need to be reconfigured.

Configuring Your Firewall

Navigate To The Configuration Interface Of Your Firewall

Every machine/ router has a way in which you can be able to change its firewall settings. Therefore, it’s hard to detail exactly how you can get to this configuration. A good place to check would be to refer to your server/ machine OS documentation to find out how to get to this part. However, we’ve sneaked in a guide for windows users who would like to change their firewall settings.

  • Go to the control panel of your windows operating system (10/8/7).
  • Click on System and Security then select Windows Firewall.

Change Settings To Point To Port 53

You need to allow traffic by change the TCP and UDP protocol settings in port 53 of your machine. Depending on the firewall of your machine, you may need to set separate rules for each protocol or a single one that encompasses both of them.

For windows users you can access this by;

  • Click on Advanced Settings on the left hand pane from the Windows Firewall window.
  • This will lead you to a window with a list of rules on the left side. From the list select Inbound Rules.
  • Select New Rule from the right pane. This will open a new inbound rule wizard.
  • From it, select port as the new rule type then click next.
  • You can then choose either TCP or UDP protocol settings and then specify the specific port that you want to open (in our case port 53); then click next.
  • Select allow the connection.
  • Choose what network the rule applies then click next.
  • Give the rule a name and add a description if you want to, then click the finish button to complete the wizard.

Change Settings In All Machines

The last thing that you need to do is to ensure that all other machines connected on your network also allow traffic through port 53. Ensure that you also enable traffic through port 53 on the server computer in your business or home.

Conclusion

It’s also important that you ensure that users can’t be able to change the local DNS IP server to something other than the specific IP address for your DNS Server. If other users on your network are able to change the DNS IP address, they will be able to bypass your DNS server and any restrictions that you might have put on your network connections. In order to ensure that this does not work, you should setup a firewall on your network to ensure that other DNS services can’t access the internet.

The good thing about setting up all connections to use port 53 is that all users on the network will be forced to use the DNS settings defined on the server computer (or router). Another nifty solution also involves having all requests that are directed to DNS server different the set one to be forwarded to your preferred DNS Server (still through port 53). This will ensure that even if the DNS server address is changed on other machines. They will still access the network’s DNS server.

All of these can be made possible by the use of your machine’s firewall.