Tools For Testing DNS Server Speed

A lot of the DNS services normally advertise on their fast speed capabilities and how they’ll be able to deliver a seamless web browsing experience. However, it’s important to note that your web browsing speed is not directly affected by the speed of your DNS servers; it’s also affected by how far the DNS server is located from you. Therefore, if you want to know how fast a specific DNS will be from your location, it’s important that you carry out a speed test. (Check out our comprehensive list of public DNS servers).

Here are some tools that you can use to check the performance of your server;

Namebench

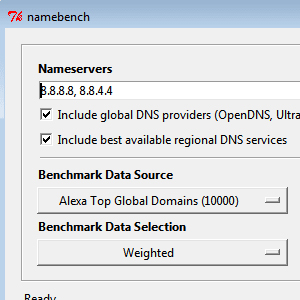
Namebench was created by the tech wizards at Google. It’s designed to find the best name server for your computer by taking factors like web browsing history, tcpdump output and standardized datasets into consideration. This means that two computers sitting side by side can have different results.

So how does it work?

When you activate Namebench, a test setup window will appear on your computer. The first section will prompt you to put in the name servers which you want to include in your test. Generally there are three sections;

  • Name servers: This refers to all the name servers that are of interest to you.
  • Include Global DNS providers: If you also want to do a test with other public DNS providers like Open DNS, then you should definitely tick this check box.
  • Include best available regional DNS services: This option will allow Namebench to automatically include the best performing DNS servers that are located in your area.

The next section will prompt you to select which tests you want to run on the DNS servers in question. Namebench will cumulatively take all of these tests into consideration and identify the fastest DNS server for your usage. You should therefore choose the tests that are more likely to benefit your web browsing. The tests include;

  • Include censorship checks: This option is for those people who are interested in getting a DNS server that limits censorship in their geographical location and at the fastest speeds.
  • Query data source: You have to specify where the test will obtain its test data sources from. By default it’s usually set to your browser history; however, you can change it to the top 2000 websites.
  • Health check performance: This option allows you to test a multitude of DNS servers (10-40). However, this test will depend on your bandwidth as well.
  • Number of queries: This option allows you to select the number of queries sent to each DNS name server.

The results will tell which name server is fastest for your web browsing and you can easily change this in your network adapter’s configuration settings.

GRC’s DNS Benchmark

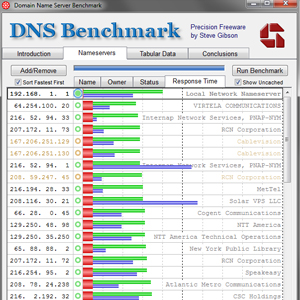
GRC’s DNS benchmark is another great tool for checking on the speed of DNS servers. It’s lightweight when compared to Namebench as it is only 164KB whereas Namebench is 5MB. DNS benchmark will help you test up to 200 publicly available DNS server as well as those servers that are currently in use by your machine. It also allows you to shorten the list of servers or add your own DNS servers that you want to test.

Just like Namebench, it also gives you a number of tests that you can run which include; caches lookups, un-cached lookups, dotcom lookups, reliability and rebinding protection.

Furthermore, it has a great way of presenting its results. It gives you the best DNS server for use by your computer and even suggests the sequence of setting up your IP addresses.

If you would like to check other DNS speed test tools you can also check this list by Senki.

A List Of Software Suggested By Google

There are a number of DNS server software that you can use; however, not so many people are conversant with the features that each of them offers. Furthermore, many people are nowadays becoming more interested with open source software which are almost similar to their commercial counterparts or even better.

Here’s our list of open source DNS server software and their differentiating features.

BIND

If there is a DNS server that can do anything, it’s definitely BIND. It also has an easy to manage web interface though you can also manage it from the command line. We would suggest that you use BIND if you have considerable experience in configuring DNS servers. This is because BIND can at times be difficult to configure.

It supports DNSSEC and can work as either an authoritative server or a recursive one.

NSD And Unbound

These two servers usually work together and have been developed by the same company. The main functionality of NSD is to allow you to set up a web page online whereas Unbound is used for searching pages on the internet.

Knot DNS

It’s usually accompanied by Knot Resolver in the same suite. These two servers were developed in 2010. One of them is an authoritative component whereas the other is a recursive name resolver. The main functionality of Knot DNS is to allow you to set up a web page online whereas Knot Resolver is used for searching pages on the internet.

They also support DNSSEC.

PowerDNS

This is another powerful DNS server. It has a lot of features including CVE and DNSSEC support. It is also quite flexible when it comes to connecting to databases.

DjbDNS

It’s similar to NSD and Unbound when it comes to functionality. The only problem (which is quite fatal sadly to say) is that it hasn’t been updated since 2001. There are already reported security issues with the system.

However, there is a more recent version of DJbDNS known as the N-DjbDNS. This version has more updates than its predecessor and has patched up the security loop holes that are known in DJbDNS. These patches have been instrumental in giving the authoritative server DNSSEC support.

MaraDNS

It’s a tiny DNS project suitable for use in embedded systems. It was developed as a single system at first but later on evolved to a two program server (similar NSD and Unbound). The best thing about MaraDNS is that it is quite easy to configure. However, it does not support DNSSEC.

Conclusion

There are several other DNS servers that have not been covered in the list but which you can also decide to use. We generally recommend that you look for server software that can be able to scale with your requirements. One other important feature for a DNS server software is that it should have an active community around it. Whichever server you choose, you will definitely run into problems with it. An active community will ensure that you can resolve any issues as quickly as possible.

Check out our walkthrough on configuring your Window’s and Mac’s DNS.

Walkthrough On Changing DNS Settings In Windows And Mac

Making use of DNS servers is a great way of boosting your browsing speeds, security and gaining access to restricted content in your geographical location. Generally, most operating systems usually have DNS set as automatic. This means that your ISP is the one that will suggest the DNS server to use. However, there’s a simple way of changing this in order for you to utilize a DNS server of your preferred choice.

We’ve compiled a simple step by step guide that will help both Windows and Mac users whenever they want to change their DNS settings.

Changing DNS Settings In Windows

Changing your DNS settings in Windows is an easy five step process. However, the steps might vary depending on the type of windows that you are using. We’ve outlined these below.

Tip: Ensure that you’ve logged into your system using valid administrator rights.

Windows 10 Users

  1. From the main screen, right click on start menu and select network connections. This will take you to the Network Connections Window.
  2. Right click on the network connection that you are currently using then click on properties.
  3.  Depending on the DNS server that you are using, you can either choose ‘Internet Protocol Version 6’ or ‘Internet Protocol Version 4’ (generally, TCP/IPV4 is more preferred for all DNS servers) then click properties.
  4. Select ‘Use the following DNS server addresses’ and then type in the IP addresses of your preferred DNS server in the Preferred DNS server and Alternate DNS server fields.
  5. Now click Ok, and then close the tabs in order of how they appear before finally closing the Network Connections Window.
  6. For your new settings to take effect immediately, ensure that you flush your web browser’s cache and the DNS resolver cache as well.

Windows 8 Users

  1. For windows 8 users, move your cursor to either the bottom right or top right corner of the screen and select settings then control panel.
  2. In the control panel window, select category and then change it to either large or small icons.
  3. From the resultant change in icons, you can then select Network and Sharing Center.
  4. Select ‘Change adapter settings’ in the new window. This will open up the Network Connections window.
  5. Right click on the network connection that you are currently using then click on properties.
  6. Depending on the DNS server that you are using, you can either choose ‘Internet Protocol Version 6’ or ‘Internet Protocol Version 4’ (generally, TCP/IPV4 is more preferred for all DNS servers) then click properties.
  7. Select ‘Use the following DNS server addresses’ and then type in the IP addresses of your preferred DNS server in the Preferred DNS server and Alternate DNS server fields.
  8. Now click Ok, and then close the tabs in order of how they appear before finally closing the Network Connections Window.
  9. For your new settings to take effect immediately, ensure that you flush your web browser’s cache and the DNS resolver cache as well.

Windows 7 Users

  1. Click on the start menu and then click on control panel.
  2. Once you are in the Control Panel Window, click on ‘View Network Status and Tasks’.
  3. Then click on ‘Change Adapter Settings’.
  4.  A new window with all your network lists will appear on the screen. Right click on the network connection that you are currently using then click on properties.
  5. You can then follow step 6-9 of setting up the DNS settings as outlined for Windows 8 users.

Changing DNS Settings In Mac OS X

In order for you to successfully change your DNS settings you’ll have to login into your system with valid administrator rights.

  1. Click on the Mac Apple sign then select system preferences.
  2. Choose network from the resultant screen.
  3. A Network center window will open; select Ethernet located on the left side of the screen.
  4. In the Network screen, click on the DNS tab then add your preferred DNS servers by clicking on the + located at the bottom left of the screen.
  5. Then click OK at the bottom right of the screen.
  6. In the Network center you will now be able to see the newly added DNS server. Click on Apply to save your settings.

You can also check out our guide for configuring a windows server on your machine.

How Your Firewall Settings Can Interfere With Your DNS Server

Most DNS server connectivity issues that are experienced are as a result of firewall settings. DNS servers work through queries (See different server software here).

This means that if you block your machine from being queried by means of a firewall, then you’ll definitely not experience any networking. However, many people never realize that they have a firewall problem at first. Here are some of the symptoms to check if you want to know whether your DNS server is being disrupted by your firewall;

  • Your machine taking long to establish a connection
  • Prevention of establishing connections by using DNS names instead of IP addresses

When you encounter these, always know that your firewall settings need to be reconfigured.

Configuring Your Firewall

Navigate To The Configuration Interface Of Your Firewall

Every machine/ router has a way in which you can be able to change its firewall settings. Therefore, it’s hard to detail exactly how you can get to this configuration. A good place to check would be to refer to your server/ machine OS documentation to find out how to get to this part. However, we’ve sneaked in a guide for windows users who would like to change their firewall settings.

  • Go to the control panel of your windows operating system (10/8/7).
  • Click on System and Security then select Windows Firewall.

Change Settings To Point To Port 53

You need to allow traffic by change the TCP and UDP protocol settings in port 53 of your machine. Depending on the firewall of your machine, you may need to set separate rules for each protocol or a single one that encompasses both of them.

For windows users you can access this by;

  • Click on Advanced Settings on the left hand pane from the Windows Firewall window.
  • This will lead you to a window with a list of rules on the left side. From the list select Inbound Rules.
  • Select New Rule from the right pane. This will open a new inbound rule wizard.
  • From it, select port as the new rule type then click next.
  • You can then choose either TCP or UDP protocol settings and then specify the specific port that you want to open (in our case port 53); then click next.
  • Select allow the connection.
  • Choose what network the rule applies then click next.
  • Give the rule a name and add a description if you want to, then click the finish button to complete the wizard.

Change Settings In All Machines

The last thing that you need to do is to ensure that all other machines connected on your network also allow traffic through port 53. Ensure that you also enable traffic through port 53 on the server computer in your business or home.

Conclusion

It’s also important that you ensure that users can’t be able to change the local DNS IP server to something other than the specific IP address for your DNS Server. If other users on your network are able to change the DNS IP address, they will be able to bypass your DNS server and any restrictions that you might have put on your network connections. In order to ensure that this does not work, you should setup a firewall on your network to ensure that other DNS services can’t access the internet.

The good thing about setting up all connections to use port 53 is that all users on the network will be forced to use the DNS settings defined on the server computer (or router). Another nifty solution also involves having all requests that are directed to DNS server different the set one to be forwarded to your preferred DNS Server (still through port 53). This will ensure that even if the DNS server address is changed on other machines. They will still access the network’s DNS server.

All of these can be made possible by the use of your machine’s firewall.

The Working Principles Of DNS Servers

Before you get to understand the working principles of DNS Servers, it’s important that you understand domain names first. Domain names are usually formed from several parts which are normally separated by dots. The basic form of a domain involves at least two parts. Domain names are usually labelled from right to left. The extreme right part is known the top level domain i.e. .com, .org etc. Each subsequent level located on the left of the domain name is known as the sub domains.

Domain Levels

Generally, a domain name can be divided into 127 levels with each part containing not more than 63 characters. For example let’s say that you have a domain xyz.com and you have two locations of your business south and north. Therefore, the domain for the south will be south.xyz.com and for the north will be north.xyz.com. Let’s further assume that you are located in the north and you have your own subdomain therefore it will be chapx.north.xyz.com. These levels can continue being added until you reach the maximum of 127 levels.

However, while adding each level you also have to consider a 254 character limit for your domain name.

DNS Servers And Working Principles

Each domain and subdomain supports multiple DNS Servers. This DNS Servers usually contain all the information about that particular domain. The main working principle of DNS Servers goes like this. A user enters a domain name in the web browser e.g. north.xyz.com. However, in order for them to receive corresponding data for that domain name, it’s necessary that the domain name is converted into a machine readable state known as an IP address. This means that the IP-address of the server will be requested from the data center before you can be able to access your site.

Note: If you are interested in finding out the IP address of each site, then you can use the ping command. To access it, you need to run the command window in Windows. Search for cmd (In Windows 10/8/7) then click on it. In the resulting window, type ping followed by the site name e.g. ping north.xyz.com then press enter. Afterwards a window will appear displaying a group of numbers (e.g. 185.152.25.25), which are the site’s IP address.

Host Names And IP Addresses

It’s important to note that domain names don’t necessarily equal to one IP address. Many domain names can have a specific IP address whereas one name can be related with a number of different IP addresses.

DNS Servers Back up

You might be wondering where all the information on the internet is stored and how it can be retrieved in case websites go down. Well, there are 13 servers around the world which contain the same information. These 13 servers are known as the root servers because they are the ones that hold the entire internet.

Forward And Reverse DNS

DNS Servers not only convert domain names to IP addresses, but they can also convert IP addresses to domain names. The former is known as forward lookup whereas the latter is known as reverse lookup.

1. DNS Records

There are generally six categories in DNS records. These include;

2. A Record (Address Record)

This record is the one that normally links up domain names to a specific IP address.

3. CNAME

Known in full as Canonical Name, it’s a tool which is used to divert requests to an alternative name

4. MX (Mail Exchanger)

This refers to the tool that is responsible for the mail exchanges for that particular domain.

5. PTR (Pointer Record)

This record is used for connecting the domain name to the established CNAME.

6. Ns (Name Servers)

Name server is an alternate name for a DNS Server. It generally points the domain name to the DNS Server.

7. SOA (State Of Authority Record)

The SOA refers to a server which has all the standard information for that particular domain.

Conclusion

You are probably confused by now of what DNS server software to use. The good thing is that many machines come with pre-installed server software that you can make use of unless you feel the need of changing it.

Here is guide on how to configure DNS server software on your Windows machine.

Compare The Different DNS Servers: Which One Is Right For You?

DNS (Domain Name Server) is one of the most integral components of the internet. Not so many people know about it yet it is one of the crucial pillars that hold the entire internet together. Just to know how integral DNS is, when you were accessing this site, there are many background processes that were queried without your realization. It also renders domain names usable. If DNS was not working properly, you would have had to type in the IP address of this site in order for you to access the content.

There are very many different DNS server software today. Each DNS server has its own set of characteristics that differentiate it from the rest. Here’s a comparison of the different DNS servers out there.

BIND

BIND was written in the 1980’s. It has been in existence for over 30 years during which it has been able receive constant upgrades. It is still regarded as one of the best DNS server software.

Bind can be able to serve as an authoritative name server or a recurs or. It also has some of most advanced DNS features which include IPv6, DNSSEC and TIG transfers. It also has an intuitive web interface that makes it easy to manage the server. You can also manage it through the command line interface.

During its earlier years, BIND was mostly used in UNIX platforms. However, given the number of upgrades that it has had over the years, BIND can be used across all platforms nowadays.

Unbound

Unbound is a more recent server software having been developed in 2006. It was later rewritten from its original Java form to C language. What makes Unbound a great DNS server software is the fact that it was made with modern features in mind and using the latest technologies that are a requirement for modern day server technology. Unlike BIND which can be used as both an authoritative and recursive name server, Unbound can only be used as a recursive name server. However, it has modules which support the DNSSEC feature.

Just like BIND, Unbound was created for use on Unix-like operating systems. However, recent developments have allowed it to be used on Windows machines.

PowerDNS

PowerDNS was written in C+++ in the late 1990s. It has been able to rise to become of the top DNS server software rivalling veterans like BIND. Part of this rise was contributed to the fact that it had a huge developer community who were always contributing to it. As of now, PowerDNS is a fully robust DNS server software that has all features similar to those of BIND and other powerful DNS servers.

However, unlike BIND and Unbound, PowerDNS does not have an interface. For you to manage it, you’ll have to be conversant with the command line interface.

Erl-DNS

Just as the name suggests, Erl-DNS was written in the Erlang language. It can be used as an authoritative name server and also provides fast query responses.

It features a number of storage techniques for zone data can be extended through the module system present in Erlang.

Dnsmasq

Dnsmasq is a free software that was first released in 2001. It one of the lightest DNS servers and can be easily configured. It also works as a DHCP server and a DNS forwarder. Just like PowerDNS, Dnsmasq can only be managed through the command line interface. It’s generally recommended for small networks.

Given that it is under the GPL licence, Dnsmasq has become a part of Linux distributions nowadays.

Microsoft DNS

Just as the name suggests, this is the server software for Windows machines. It can be able to serve as an authoritative name server as well as a recursive one. It features a standard DNS zone file, supports CLI management, DNSSEC, Dynamic DNS and NSEC3 support among others. It can be generally used on many enterprise networks.